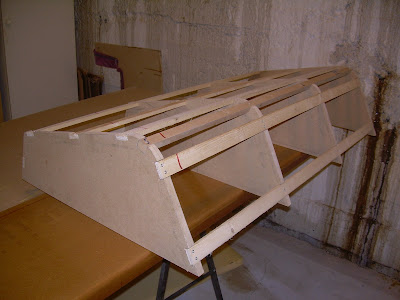
I mounted the battens for the deck.
Anchor locker being roughly cut to size. I expect this is easier achieved before hull join.
Planking the main cabin deck.
Detailed study of unsuccessful infusion of daggerboard case with gel coat.
Friday, March 20, 2009
Wednesday, March 18, 2009
Making smaller parts
While waiting for the hull to cure, while the heater is still not working properly, before starting working inside it, I have been working on some of the small parts to be mounted in the hull. When starting to plank the anchor locker I found out that I was almost totally out of unperforated core. I used some leftovers from the Frimann centreboard making. It ended up with a lot of small patches, here the joins curing under some stabilizing pressure.
Another view
Laminating outside using the poor man's vacuum bagging and basic principles described by Isaac Newton. Using a plastic sheet over the peel ply worked great.
The daggerboard case mould with raised areas for making glueing recesses and waxed with carnuba wax.
Resin infusion of a small test panel on the mould. I tried to put a thin layer of gel coat on the mould first, then dry lay up while the gel coat was gelling and regular infusion. Either the gel coat layer was to thin, or it was not satisfactory gelled, or something other did not work out, because the intended result, avoidance of numerous pin holes in the surface, did not occur. However, the epoxy impregnated and waxed mould worked perfect.
Tuesday, March 10, 2009
Lamination evaluation
The result of this lamination was, unexpectedly, inferior to the other hull side. The problem is too much resin left in the laminate. Also there were a few dry spots, I fixed those with more epoxy before the first batch was fully cured and expect a good chemical bond to the rest of the laminate. I think there are several factors leading to this result:
1. Higher temperature in the workshop. The temperature makes a huge difference on the gel-time of the epoxy.
2. Holes in the bag, it took a long time until these were located and fixed. This also lead to more epoxy gelling before adequate vacuum.
3. Huge overlaps of the release film. The worst result is in the bow area, I found huge overlaps of release film here. The release film is perforated, but when two layers overlap the perforations does not align and there is no way for the epoxy to escape.
All the above leads to less distribution of and less escape of excess resin.
This inferior result does not compromise the structure of the hull, it just makes it a bit heavier and with a more uneven surface in the interior. All over I'm happy with the result.
Fixing dry spots:
Hull half overview:
The daggerboard case mold. Raised area for making recess. I will make a test infusion with gelcoat first layer to the mold. If this works I will probably try this with the foils as well.
Anchor locker mold:
This is to notify the owner of this hat that it has been taken care of to the best of my abilities.
Sunday, March 08, 2009
Laminating party - we did it again
Yesterday was another great day in my workshop. With the great help from Eivind, Robert, Silas, Ståle and OJ the starboard half was laminated and bagged from keel line to deck. It was really difficult to achieve vacuum this time, and at last we found the reason; somehow there were three small holes in the bag at the aft end. These did not make any sound and thus were extremely difficult to locate. As the first was located and closed, the vacuum rose immediately making the two other holes easy to locate. We pulled approximately 95% vacuum with these leaks stopped.
Applying the vacuum bag to the 2 cm extra foam along center line:
Searching for leaks
Finally pulling an adequate vacuum, approximately -0.95 bar
Applying the vacuum bag to the 2 cm extra foam along center line:
Searching for leaks
Finally pulling an adequate vacuum, approximately -0.95 bar
Wednesday, March 04, 2009
Mostly invisible progress
I have spent some time the last week doing the interior finish. The hull half foam have been glued together, mostly two rounds of putty with no sanding in between. Then the whole interior was sanded down and another layer of putty applied where necessary. This is the only interior finish I will do, except perhaps painting the carbon to make it a bit lighter.
I have also worked on the bulkheads and panels for the starboard half, backfilling all open areas with putty as seen in the next pictures.
I think all panels are ready now, except three that I still have to make; aft cabin bunktop, daggerboard support web and bow bulkhead.
Working on the form frames for the anchor locker.
Subscribe to:
Posts (Atom)