Sunday, April 26, 2009

Minor main hull progress

It has been busy with work, lots of things to do in the house and garden, broken cars etc. I have, however, made a few short trips to the workshop, doing a little bit of progress.

The anchor locker ended up bullet proof. No worries about an anchor banging around in rough weather.


I finally finished the bogging around HD inserts and other joins, now ready for laminating the decks.


Aft deck being vacuum infused. I really like the method, but I would not recommend it to anyone on a one off hull. If you have moulds however, or for flat panels...


Decided on regular vacuum baging on the rest of the deck. Fabric being cut to size and kept in place with 3M 77?


Vacuum bag cut and attached along one side.


Peel ply, release film, bleeder and unidirectional reinforcements ready cut, waiting for the glueing party.


Everything safe under vacuum.

Wednesday, April 08, 2009

Ponton heater boxes - finale

When the inside was cured enough that I could handle the boxes again (around midnight) it was this area left to give an external laminate.


After lamination.


The finished, laminating wise, boxes receiving a warm airflow from the 40 kW heater.


I had planned to cover the boxes in a layer High Build primer, but time does not allow that. I think they will be OK with just a spay primer and some matt paint

Ponton heater boxes part eight

It was time to give the heaters an internal protective layer of epoxy. No need for further structural improvement, so a simple epoxy coat will do. I could not resist though, to put in a small piece of some advanced fibres. It's a 240 g/m² Kevlar/carbon hybrid and it has excellent abrasion resistance as well as good structural properties.


It is placed at the bottom of the "radiator" seating.

Tuesday, April 07, 2009

Ponton heater boxes part seven

After joining three of the sides I was left with a rather big hole on the top side of the heater box.


I made a mould from a piece of wood to get a solid surface to laminate on. The piece was covered with packaging tape for release and shaped to fit the box on the inside on the level of the hole. Then I placed a wetted out piece of glass inside the mould and the wood was pressed in place using a clamp inside.


I had to replace the missing cardboard and used a piece of Divinycell, X-linked PVC foam. Easy to shape. Here the mould test fitted and the Divinycell panel laying on the side.


Trying out the Divinycell panel.


Obviously, it is not possible to laminate and take pictures at the same time, so here the laminating is finished.


Then I covered the inside metal part of the good one.

Vacuum infusion

In between the Mercedes work I managed to do an infusion. This is the panel for the front bulkhead and the daggerboard support web. The process went on uneventfully and another aerospace quality panel was picked out of the bag this morning. Amazing how this method makes extremely good panels with a reasonable amount of work and no dirty hands. Definitely the method of choice for making flat panels.

Ponton heater boxes parts four through six

On Sunday, I was able to laminate one side of the best heater.


Then the more damaged one was connected on one side. I have to do this in several operations in order to get the geometry right, and some cardboard is also missing and have to be replaced somehow.
Here, the two pieces are held together, hopefully in the correct position, with clamps as the first side is being glued together using an overlapping glass laminate.


Then, yesterday morning the first connecting laminate was enough hardened to proceed. I made a glass piece for the opposite side.


Still need for several clamps to keep the parts in correct position.


A long glass piece was cut for the top side of the other heater box


The two heaters after wet out and peel ply.


After some curing I was able to do another lamination later the same day. The reconnected heater box was now stable enough for regular handling and I went on with a laminate on the underside. The clamps are compressing the epoxy soaked dissolved cardboard making a pretty reasonable result.


Still several rounds of handling required, which is a problem as the deadline tomorrow morning is coming up fast....

Sunday, April 05, 2009

Ponton heater boxes part three

I stuffed up another section with wooden pieces (and a tommestokk) and laminated, using only peel ply this time. The result from yesterday was by the way very satisfactory, needing only a spray primer and some paint I hope, before presentable.


In the opposite end, the tube for the defroster air is glued in using the laminate as well is the torpedo wall attachment flange.


On the other heater I started inside this end, replacing a rusty and perforated channel with a quite smooth glass/epoxy surfaced one.

Ponton heater boxes - sandblasting

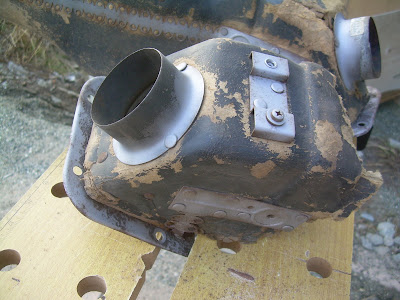
As I mentioned earlier, there are areas of advanced rust on these parts.


Another view


I managed to clean it up quite well, with small damage to the cardboard.


The pieces, ready for part three

Saturday, April 04, 2009

Ponton heater boxes part two

I had some serious starting problems. Where do you start on a project like this? I decided to glue together some split areas on the best box and start to restore the original shape on the other one. I stuffed it with pieces of wood to get the shape restored. Here you see the boxes stuffed, and some of the dirt I dug out of them.


Then I cut the glass and consumables, still very anxious to find out the working time on the epoxy as this was not declared on the label. Ambient temp 20 - 25 C, epoxy kept in 20 C. It was very well workable for half an hour. Just started to spread the glue.


Here two defects being glued together on the least damaged one.


The other one getting it's shape restored. Glass covered with peel ply and a sheet of used vacuum bag, then an attempt to achieve some pressure on the laminate using tape.

Ponton heater boxes

My brothers Ponton is nearing completion and I have started the restoring of the heater boxes. They are made from 53 years old rotten cardboard and a bunch of dirt. I have spent some time trying to figure out how to get them ok. I'll try to cover them with a thin layer of fibreglass/epoxy on the outside and a coat on the inside for water protection. I'll try to glue the metal parts in place after sandblasting them. I bought some epoxy and woven glass at Biltema (a Scandinavian low price car part and tools chain) for this job, as this is about 1/8 of the cost of my boat stuff, and good enough for this purpose. The fabric is 290g/m² and the weave is plain. Twill or satin weave would have been better due to the complex curves but I hope I will manage.

There are two sets of boxes, from the soon finished car, and from the donor car whose life ended about a week ago in a certified car churchyard. One of the sets are previously tried repaired using polyester and chopped strand mat. They are heavy with a rough appearance and quite bad state inside. The other set are original, one is broken in two parts and all the metal parts are quite heavily attacked from rust. I think the latter set is most likely turned into a working set with an appearance acceptable to a rebuild within the standards of this project.


Back on my feet

I have been unable to do anything productive for more than a week due to an upper respiratory tract infection, but I am now slowly recovering. Hence, there are now finally some progress to report.

I finished planking the deck.


Then I cut the high density (HD) foam for the high load deck fittings.


And placed them. Unfortunately, I have not yet been able to figure out the placement for all such fittings and quite a few more areas will have to be backfilled later.


The inside of the anchor locker have been filled with putty.


Preparing for the infusion of the last few panels.