Vacuum resin infusion, although not rocket science, demands accurate and thorough craftsmanship. I think I was a bit in a rush, pushing for launch before the summer is once again gone in my last attempt. I had the pleasure of having Thomas, one of the original co owners of Frimann, visiting yesterday. And he was keen on seeing an infusion process, so we had to finish placing the consumables and the bag. We made sure the bag was well over sized this time, and able to fold around every tubes and other obstacles. This went quite uneventful, and as the pressure gauge read -1,0 bar, we decided to mix up some epoxy and keep on in the small hours.
I tried a new thing this time. As this infusion was not well planned, the workshop and thus the moulds and epoxy was not pre heated and only held around 18 degrees (my "idle" temp in the workshop) until we started and turned up the thermostat a bit. To overcome this, and to assure good flow and promote early gelling, I used my heat gun to warm up the epoxy just as it entered the bag. Other than a slight deformation of the plastic sucking hose, this seemed to work great. It all wetted out easily, and within a few quarters of an hour the exothermic reaction was obvious. And it all happened without any of us taking active part, we just enjoyed watching the process.
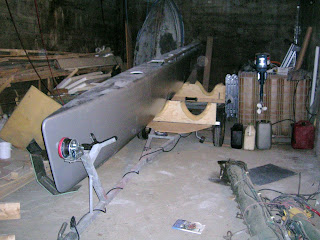
De moulding was also a bit of an excitement as the mould is old and somewhat in poor condition, and has to be used once more for the upper trailing half. But this went smoother than I dared hoping for, and out of the mould popped a perfect quarter of my new wing mast. What a marvellous feeling.
Update Jan 29:
We were really focused on the work during the mast infusion and the preparations for that, so I didn't even notice I had left the camera at home. The process was however identical to the last attempt, except 800gsm less 0º UD fibres all over, 400gsm more 90º UD fibres around the track and a lot bigger bag. I took a couple of post festum shots the following day but I have struggled to get them out of my phone. But here are two shots of the lower trailing edge part of the mast:
I cleaned up the workshop and waxed the next 1,5m of mould to be used in the next infusion. The upper section is 1,5m longer than this, all of which is a smaller profile, ending with a chord of about 30cm (one foot) at the mast top. However, due to sick kids and me going away for a week on a work/skiing related trip, I have not prepared more for the next part. I hope to have started the assembly by week 8.
I dropped by the paint shop this afternoon to discuss details on the white area and non skid areas, and both floats, the pop top and the rudder case are now yellow. Even better finish on the second float. This will look like a floating Lamborghini ;-)
The rudder case below, and in front my first soft shacle and Brummel splice made from a 4mm 12 strand braided Spectra? probably.
Next update in a week and a half or so.
Friday, January 28, 2011
Friday, January 21, 2011
First float painted with first colour
This afternoon the starboard float got it's yellow paint. Jotun TopGloss 2-part PU-paint. It is still not dry on the pictures. The deck and beams will be white with antiskid.
Restarting mast build
After a few days of cleaning up in the workshop (everything was covered in dust of course) I restarted the mast build. The lay up is modified, about 40% lighter than in the disastrous previous infusion.
I have re-waxed the mould, cut carbon and foam, made up the tube for the sail track (they come in 4m lengths and require an air tight join) and placed these pieces in the mould under a layer of peel ply. I will continue with release film, resin distribution material, spiral tubes and hosing and then, very meticulously, place a new bag over it all. And then....
The pain guys have been really busy, and I'm not about to launch anyway, so the floats have been down prioritized. But they might get their colour tomorrow. Pictures to be published as soon as there are any.
Friday, January 14, 2011
The floats left the building
I took the floats and the other small parts to the paint shop today. It was a beautiful view in sunshine, half a foot of fresh snow and 13 degrees below zero.
The painters have faired one float this afternoon and he said I did a good job and he expects a good result. I'm very excited to see the painted float, should be ready one of the days next week. I will also bring the main hull to the shop as they can heat their paint box to about 80 degrees so leaving it in there over night is a very convenient way to make sure the main hull is properly post cured before I start fairing.
The painters have faired one float this afternoon and he said I did a good job and he expects a good result. I'm very excited to see the painted float, should be ready one of the days next week. I will also bring the main hull to the shop as they can heat their paint box to about 80 degrees so leaving it in there over night is a very convenient way to make sure the main hull is properly post cured before I start fairing.
Winter sales
I was lucky to source some more goodies at heavily discounted prices:
I found these items in a Swedish web shop at very competitive prices. 2 Lewmar 30 AST winches, bunch of Spinlock XAS 0408/1's, a Silva race compass and a Solara M-series 50W solar panel.
Test-fitting the Ronstan lightweight spinnaker tack block. I wonder what, if anything, to do with the pole end.
Going to the paint shop tomorrow
Tomorrow I will deliver the floats, pop-top, rudder with case, jib traveller, beams and bow pole at the paint shop. This is to be considered a test session, so I'm not sure everything will be finished this week end. These parts will most likely not go back to the workshop anyway, as there is not enough space for mounting the boat in there anyway.
First round of fairing compound on the jib traveller
316 tapping plate for spinnaker tack embedded in epoxy/chopped cotton mix and glassed(!) over.
Port float, pop-top and rudder assembly curing after the last coat of HB primer.
Starboard float waiting on the custom float trailer
Jib traveller coated
Monday, January 03, 2011
New year, the one in which Panta Rei meets the water....
One year ago the boat was like this:
It might not look like it but the progress has not been bad actually, with a baby and two months out due to a nasty prolaps. Hopefully this year will show to be even more productive and contain some sailing as a proove to that.
Holidays are never productive for me, too much other obligations. But I managed to finish the starboard float for transportation to the painter. The surface is rough and will be sanded on arrival, but the shape seems to be there:
The custom float trailer was made yesterday:
Today I started sanding and filling the last pinholes on the port float.
The rudder case have gone a few rounds with filler and sanding and is almost there as well:
The pop top getting filler on the edge in order to make a nice smooth edge:
Subscribe to:
Posts (Atom)


