Monday, April 30, 2007

Nearing completion inside floats

The first thing to do today was to lift the starboard hull down from the "pedestal" and lay it down in form frames 5 and 9.


Then I had success in removing the mold plates, some of the releasewax must have survived from laminating in port hull. Then I cut away and sanded the aft beam bulkhead access hole:


Then I started fitting the chain plate. First cutting the hole in the deck flange and aligning according to plan:


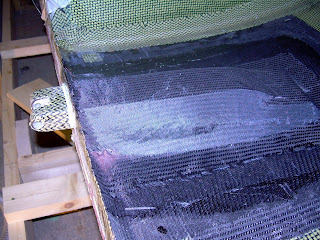
Then I bedded the chain plate in high density putty (epoxy and microfibers) and started to build up around the chain plate. When almost cured I made up a new batch of putty with some microballoons in it as well this time to get a smooth shape before laying down the 45/45 fabric. One extra layer on this side as well, a total of 600 g carbon. Wetted out, added peel ply, release film, bleeder and put it all under vacuum:


Unfortunately, I was forced to buy the fast hardener for the Ampreg 20 system I'm using for hand lay ups as that was the only available (I'll get more slow at the end of this week, supposedly) and this led to a race against the clock all day (and when laying up the beam bulkhead flanges yesterday as well) but I was pleased with the final result:

Then it was time to unwrap my experiment with the carbon tubes. Removing the vacuum bag, RDM and release film was just a walk in the park.


But releasing the carbon tube from the PVC tube was close to impossible even though I thoroughly waxed the tube before lamination yesterday. I ended up cutting the laminate on two sides of the tube (before epoxy was fully cured, just become hard, curing of the infusion epoxy until reasonable stiffness takes days in 20 deg Celcius) and then cm by cm releasing the halves from the PVC tube with a sharp knife. I ended up with two "halfpipes", one to sit on each of the storage compartment's walls:

Even though this was a lot more difficult than anticipated it ended up as two pieces I can use for the intended purpose. But I have to find a better way to make the other two. Here's a close up of the "halfpipes":


That was it for today. It really takes a lot of time to build a boat. Now just have to make another tube and glue them in place before starting with the decks.

Finally building again

After a period with a lot of work and obligations to my family I will hopefully do some progress the next few days. I am now finished with the inside taping of the starboard float laying down the beam flanges today after tearing off the peel ply from the last layer, setting up the flange molds that I had from port side taping and laying 4 layers of 500g carbon. I remembered that I did not wax the molds when I was about to leave for the evening, it will be a thrill to see if I can get the molds out tomorrow....:


I also picked down the float form frames as these have now served their duty.


From Frimann I have the experience that the floats are always wet. That is why I will do as Henny and make nets in the bottom of the storage compartments. Today I made the first effort to make a carbon tube for attaching these nets. I waxed a 20mm outer diameter PVC pipe and laid down 500g bi ax carbon, peel ply, release film and RDM:


Then wrapped it all around the tube and sealed it in a bag (actually all but the tube endings, still 1 atm inside tube):


The middle hose is sucking from the epoxy bucket and the two other tubes at the ends are connected to the resin trap. This picture was taken just after opening the resin inlet. The tube is attached to the table in order to keep it straight during curing:


This picture was taken 16 mins later, the inlet is closed but vacuum still working from the ends. It will stay this way over night. In the background you can see the main hull form frames, two of which I will have to make over due to change in my plans according to model:


I can't wait to see if I can a) release the flange molds from the flanges and b) use this tube for the intended purpose.
Time will show...

Monday, April 23, 2007

Starboard float internal laminations. Reconsidering cruising cabin aft cockpit version.

Slow progress due to other obligations in the latest. I have however worked on the internal lamination on the starboard float. All reinforcements have been cut and all deck flanges is made. I also glued in the aluminum tapping plate for the bow eye:
Here is a picture of the first laminations on the aft side of the forward beam bulkhead. Next is setting up the mold plates to make the carbon beam flange.
I also had several sailors visiting me this week-end. I took advantage of this situation to see if anyone could talk me into building one of the aft cabin versions. I have to digest what came out of the discussions for a while, but it seems today that I most likely will go for the cuddy cabin plus aft cabin version. Need to find final solutions for the galley and cockpit tent though.
I see several advantages with the large central cockpit and aft cabin. The boat will be used for both racing and family cruising with children and I try to find the best solution to cover the different needs. The northern climate has to be taken into consideration as well, of course, I live almost 64 deg north... Here is an interior scetch of this version:

Tuesday, April 17, 2007

Shaping the keel on first float

The plans contain detailed descriptions on the keel shape on three different locations along the floats, and the shape is supposed to describe a part of a circle with increasing radius from bow to stern. From this I calculated the radius on several locations, 2-3 feet increments and made patterns in pieces of MDF:Using these patterns I shaped the keel on the chosen locations as this photograpy illustrates:
Then drawing lines with a marker on these locations and finally: I got to use my long-board! I made the long-board from a board made for concrete fairing (12 x 120 cm) and then made brackets to hold the 60 grit paper. It is made from some kind of foam and weighs nothing. I may modify it further to look like Henny's board to be able to connect the vacuum cleaner.
Anyway, with the long-board I faired down the areas in between the pre shaped areas until the marker lines was gone. This made a very fair curve and it is reproducable for the next float. I did not come down to the inner laminate at any position but it was quite close on the three last feet.The keel profile seen from the bow. I have a few obvious low spots and I know it comes from ending the battens on a sub optimal position, leaving the last piece of the batten too straight. I will fill in the most obvious low spots, but otherwise focus on not leaving any high spots before laminating the outside. I see that Martin did quite a lot of filling and fairing prior to the lamination but my experiences today tell me it is quite difficult to fair well when you combine bog and H60 Divinycell and I will thus keep most of the bog outside the outer laminate.
Keel profile seen from the stern. It really looks like a fast shape!

Monday, April 16, 2007

Taping starboard float

Both floats out of the form frames. I could make a beach cat and save lot of work!:
Then making the compression strut and glueing in place. I use one layer of 240 g uni carbon under the two layers of inner fabric called for in the plans. Probably not necessary but it does not add much weight anyway. And the keel line tape covered with peel ply is visible underneath:The whole keel line taped and covered with peel ply. After this picture was taken (and the epoxy had cured) I removed the peel ply and added a layer of epoxy along the whole keel line as recommended in the plans.

Several things have happened since last posting

First, I suddenly became the owner of a monoslug. My old trimaran "Frimann" is in Oslo, which is 600 km from my home and I don't get to sail it very often any more. The Snipe can only be sailed with wet-suit and one competent crew. I was looking around on the internet when I found a small monoslug and made a joke to my landlord Guttorm about buying one of those to have a sail every wednesday until the F-22 is finished and a few hours later I was the happy owner of the half of this beauty, a Maxi 77:Then I finished the Epoxy-pre-heating-closet:
Wet lay up and vacuum bagging the trike seat:
Then my future crew and trike rider Eilert showed up to check up on the progress of my work:
The trike with "new" seat, the only carbon/kevlar composite trike seat in kindergarden, I presume:

Sunday, April 08, 2007

Joining starboard float

It has been a while since my last posting. I've been busy working and visiting my family in Lillehammer, the skiing town where I grew up. I learned to sail on the lake Mjøsa with short steep waves and constantly changing winds. I prefer the ocean.

Before I left, however, I joined the starboard float. After the last adjusting with the sander I applied generous of bog on all bulkhead and keel joins and strapped the upper hull half down over the bulkhead locations and pressed the keel line together with a number of clamps:
Then the "not so fun taping inside the float circus" began. Laying down putty fillets along the bulkhead, then one or two layers of tape (two layers on the beam bulkheads) and peel ply, everything wet in wet. All done in three and a half hours, wonderful to get up in supine position and stretch the back after the job was done.

I bought an extra long paint brush for the forward bulkhead taping and I think it came out pretty well this time. I left the lower 4" or so till the float is in upright position, will tape it along with the keel tape.
When returning from Lillehammer, the winter was back! Lots of snow and freezing temperature compared to the last weeks when the spring has been knocking on the door. My workshop is inside the door at the green arrow:
I just bougt a small air driven sander and today I installed the compressor and tested this. It works great. Bought from Wuerth, looks like this and use 50 mm sanding pad and a lot of other stuff on 6mm shaft.
I also glued in 4" pieces of tape along the keel between all bulkheads. And I sat up an old wardrobe in which I will keep the epoxy along with a small electrical heater in order to preheat the epoxy to about 30 deg C before infusion as the viscosity of the epoxy is very temperature dependent.